Android Binder Tutorial [Part Three]: Native Service registration.
Introduction.
The Android platform provides and runs predefined system
services and every Android application can use them, given the right
permissions. These system services are usually exposed via a specific Manager
class. Access to them can be gained via the getSystemService() method. The Context class
defines several constants for accessing these services.
An Android application can, in addition to consuming the
existing Android platform services, define and use new services. However for
the sake of simplicity and ease we will restrict ourselves to the system
services.
If you need to add a new service in your application this is
a great article to follow.
In this tutorial, we will see the registration
of MediaPlayerService to illustrate how to register a service with the
ServiceManager through the binder in the Native layer. We will also learn how
the client obtains a service from the binder to the ServiceManager and invokes the
Service’s method.
First, let us look at the main method of main_mediaserver.cpp.

A ProcessState object is first obtained through
ProcessState::self(). ProcessState is a process-related object, and only one
ProcessState object exists in a process. First,Let us look at ProcessState::self()
and the constructor.


The definition of gProcess
is in the static.cpp file. When the main function of main_mediaserver first
calls the ProcessState::self() method, gProcess is empty, so a ProcessState
object is constructed first. In the ProcessState constructor, the
open_driver() method is called first to open the /dev/binder device.
Opening the /dev/binder device invokes the binder_open method
in the binder driver. In the previous analysis of the ServiceManager we have
analyzed it. This method first creates a binder_proc object, initializes its
pid and task_struct structures, and links it to itself. The global binder_procs
list. After successfully opening the /dev/binder device, we send the
BINDER_VERSION and BINDER_SET_MAX_THREADS commands to the binder driver via
ioctl. We go to binder_ioctl to analyze it.

As discussed
in the previous analysis of the ServiceManager, the binder_get_thread is first
called to construct a binder_thread object for the meidaservcie and link it to
the threads/red/black tree of the previously created binder_proc data
structure. It is easier to handle BINDER_SET_MAX_THREADS and
BINDER_VERSION.
Going
back to the ProcessState constructor, the mmap method is then called to
allocate the actual physical pages and map the memory for user space and kernel
space.
In main_mediaserver.cpp, we call defaultServiceManager() to get
a pointer to the ServiceManager's binder. We will analyze this method
later.
Then we instantiate several different services, we only analyze
the two services AudioFlinger and MediaPlayerService here. AudioFlinger
inherits from BinderService as follows.

BinderService is a class template and implements
the instantiate() method as follows.

The instantiate()
method calls the publish() function to register the service with the
ServiceManager. Before introducing the defaultServiceManager() function,
let's first look at the relationships of the several classes we just talked
about.

As you can see from the figure above, IServiceManager inherits
from the IInterface class, while IInterface has two important macro
definitions, DECLARE_META_INTERFACE and IMPLEMENT_META_INTERFACE.

Like ProcessState, the gDefaultServiceManager defined in
Static.cpp, so there will only be one instance in a process. When calling
the defaultServiceManager() function for the first time, it will call
ProcessState's getContextObject method to get a Bpbinder (first we need to have
a concept, BpBinder is a proxy binder, BnBinder is the real implementation of
the service).

getContextObject will
directly call getStrongProxyForHandle() method to get a BpBinder, and the
incoming handler id is 0. As mentioned in the ServiceManager tutorial, the
handle value of the ServiceManager in the binder driver is 0, so here we get
the ServiceManager BpBinder.
getStrongProxyForHandle.
LookupHandleLocked(0)
is first used to find if there is no BpBinder with hande equal to 0 in the
mHandleToObject array. If it does not exist, we create a new entry and set both
its binder and refs to NULL. Going back to getStrongProxyForHandle, since
binder is equal to NULL and hande is equal to 0, the transact method of
IPCThreadState is called to test if the ServiceManager has been registered or
if the ServiceManager is still alive.
We
send PING_TRANSACTION to the ServiceManager check whether the ServiceManager is
registered here.
First,
it is assumed that the ServiceManager has been registered in the system and is
still alive. A BpBinder(0) is then created and returned.
Returning to the
defaultServiceManager() function, ProcessState::self()->getContextObject(NULL)
actually returns a BpBinder(0).


It
directly calls the ASIntervceManager's asInterface method. AsInterface is one
of the three functions we defined earlier in the DECLARE_META_INTERFACE and
IMPLEMENT_META_INTERFACE macros. Let us take a look at the definition of these
two macros.
The
DECLARE_META_INTERFACE macro declares four functions, including constructors
and destructors; it also contains asInterface and asInterface. Both macros
have parameters, where INTERFACE is the class name of the function. For
example, IServiceManager.cpp defines INTERFACE as the ServiceManager; NAME is
"android.os.IServiceManager" and INTERFACE is passed through the
"##" in the macro definition. The name is preceded by "I", as
defined in IServiceManager.cpp.
EXAMPLE MACRO EXPANSION
DECLARE_META_INTERFACE(ServiceManager);
IMPLEMENT_META_INTERFACE(ServiceManager, "android.os.IServiceManager" );
Through
a series of calls [Expand the Macro's and see the code for yourself],
BpBinder(0) is finally recorded in the mRemote variable and its strong and weak
pointer reference count is increased.
We
return to BinderService's instantiate() method, sm is
BpServiceManager(BpBinder(0)), and then call its addService method to expand
the BinderService publish method as follows.

Let us look at the addService implementation.
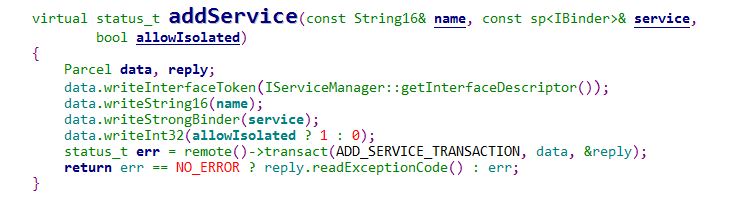
We
define two Parcel objects, one for storing the sent data and one for receiving
the response.
First
we write the strict mode to Parcel. This will be used by the binder to do the
PRC test. Then the "android.os.IServiceManager" and
"media.audio_flinger" will also be written to the Parcel
object. Let's take a look at the writeStrongBinder method. The parameter
is an AudioFlinger object.


In
the flat_binder_object data structure, binders and handles hold different
objects depending on the type.
If
the type is BINDER_TYPE_HANDLE, it means that the flat_binder_object stores a
handle id value in the binder driver, so the handle id will be recorded in the
handle.
If
the type is BINDER_TYPE_BINDER, the flat_binder_object stores a binder object,
so the binder object will be put in the binder.
The
AudioFlinger object here is inherited from the BBinder, so its localBinder will
not be empty. Hence, we set the flat_binder_object's binder to the RefBase's
mRefs variable, and set the cookie to AudioFlinger itself.
Then
we call finish_flatten_binder to write flat_binder_object to Parcel. Look
at the implementation of finish_flatten_binder.


The
above code first checks whether the allocated array space in Parcel is enough.
If it is not enough it expands the allocated array. If the size of the array
space is enough, the above flat_binder_object is written to mData+mDataPos and
it is in mObjects.
In
order to quickly find all the binder, we use the mObjects array to save the
offset address of all flat_binder_object data structure written to Parcel,
mObjectSize, save flat_binder_object data written.
After
writing all the above data to Parcel call the remote()->transact method. We
know that remote() here returns BpBinder(0), so the BpBinder transact method is
called here.


This
will call the transact method of IPCThreadState, where mHandle is equal to 0,
indicating that the data is sent to the ServiceManager, the code is
ADD_SERVICE_TRANSACTION, and data is the Parcel data drawn above. Look at
the transact implementation of IPCThreadState.

There are two Parcel
objects in IPCThreadState, one is Parcel& data and the other is Parcel*
reply. They are used to record the data sent to the binder driver and
propagate the data written by the binder to the upper layer, which we will see
later. Let us look at the implementation of writeTransactionData.

First let us see the
binder_transaction_data data structure, which is defined in binder.h in the
binder driver.

The
target in the binder_transaction_data structure records whom is this intended
for.
If
the data is sent from the user layer to the binder driver this contains the
handle to the handle id of the service to be sent to the binder.
If
the kernel wants to send it back to the upper layer this will be set to the
weak refs of the binder to be sent.[PLEASE DUMP THE DATA in kernel driver to see the details].
Going
back to the transact method of IPCThreadState. We call waitForResponse on the
binder driver interaction and get the reply result. TF_ONE_WAY indicates
that this is an asynchronous message or does not need to wait for a
reply.

In
the above code, the loop called talkWithDriver interacts with the binder driver
and gets reply until the obtained reply cmd is BR_REPLY or an error exits.
The
driver will allocate the binder_transaction structure of this transaction and put in the reply from
binder_transaction function.
Because
the current transaction needs to wait for a reply (the flag of TF_ONE_WAY is
not set), ServiceManager needs to notify the thread that registered the
AudioFlinger service after processing the transaction.
If
there is binder type data in the incoming binder_transaction_data data, the
binder data will be processed one by one. Since the registered binder type
of the AudioFinger service this time is BINDER_TYPE_BINDER.
binder_new_node
is called to create a binder_node. In the previous talk about the ServiceManager
start process has been said binder_new_node and binder_node data
structure.
After
this call binder_get_ref_for_node creates a binder_ref for the newly created
binder_ref object.
The
desc data in the binder_ref object is the value of the handle id we return in
the get binder.
Back
to talkWithDriver function, after executing the command through ioctl and
returning 0. The
above write_consumed will be set to 0 in binder_thread_write, and read_consumed
will be set to 8 in binder_thread_read (because there are two commands BR_NOOP
and BR_TRANSACTION_COMPLETE).
Back
in ServiceManager, it waits for the client's request in
wait_event_freezable_exclusive.

Finally
call svcmgr_handler to handle the specific transaction. In this case it is SVC_MGR_ADD_SERVICE.

First remove from the
thread->transaction_stack start to deal with ADD_SERVICE when the
binder_transaction object is created, the thread is the thread where the
ServiceManager, and target_thread and target_proc are registered AudioFlinger
thread.
In this similar way, The reponse from the
servicemanager is sent via the binder.
Then call binder_pop_transaction(target_thread,
in_reply_to) to release the memory where in_reply_to is located. It is
then sent to the thread on which AudioFlinger is registered; and a tcomplete
object is added to the todo queue of the thread on which the ServiceManager is
located.
To summarize all the above discussion
into simple steps.
1. Construct
a BpServiceManager object by defaultServiceManager() method, where mRemote is
BpBinder(0)
2. Invoke
the addService method of BpServiceManager, which is actually calling BpBinder's
transact method, code is ADD_SERVICE_TRANSACTION
3. BpBinder
sends the BC_TRANSACTION cmd to the binder driver via the transact of the
IPCThreadState, and waits for the binder-driven BR_REPLY reply.
4. binder
driver receives the BC_TRANSACTION instruction, it constructs a binder_node for
the MediaPlayerService and adds it to the binders tree of the binder_proc (this
is the node with two nodes, an AudioFlinger and a MeidaPlayerService), and then
constructs a binder_node. Then modifies the binder_refs structureand overrides
the passed type and handle values. Constructs a binder_transaction to add
to the service manager's todo queue.
5. 5.ServiceManager
remove binder_transaction object, and according to the name and refs (handle
id) inside, construct a svcinfo object and join the global svclist linked list
6. Do
a reply and release the previously requested memory
Starting
the transaction thread
When
all the services are registered in main_mediaserver.cpp, the next two functions
are called:
ProcessState::self()->startThreadPool()
IPCThreadState::self()->joinThreadPool().
First let us look at the
ProcessState::self()->startThreadPool() method:


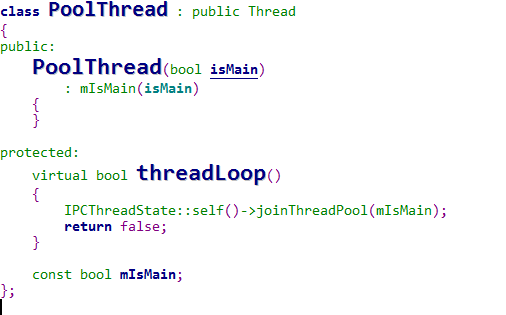
startThreadPool
calls spawnPooledThread directly to start the thread pool. makeBinderThreadName
constructs a "Binder_%X" string as the thread name.
Then
creates a new PoolThread thread and call its run method. The thread's run
method will eventually call the threadLoop method, which is called
IPCThreadState::self()->joinThreadPool(true).
So
here we start two threads to continuously process transactions, first look at
the implementation of joinThreadPool.

The default parameter
passed into the joinThreadPool is true, so the BC_ENTER_LOOPER command is sent
to the binder driver. When we analyzed the ServiceManager, we have seen the
processed code, but set the thread->looper property to
BINDER_LOOPER_STATE_ENTERED. So starting two threads above will always
call getAndExecuteCommand to wait for the transaction, never exit; and if the
thread created by calling joinThreadPool(false) will exit without transaction
when there is no transaction. Let's look at when we will call
joinThreadPool(false) to create thread.

Finally, we call
ProcessState::self()->startThreadPool(false) to start a thread and send a
BC_REGISTER_LOOPER command to the binder driver. Let's take a look at the code.

We shall see how NativeServices registered
above are obtained and used in the subsequent chapters.


Comments
Post a Comment